Breaking Bread: Recipes That Celebrate Culture, Connection, and Community

Few things embody the spirit of togetherness quite like the act of breaking bread—a timeless gesture of connection, warmth, and shared experience.
Much like art, the act of sharing a meal can create space for storytelling and connection that bridges cultures and deepens bonds.
With that, we’re excited to share a collection of cherished bread recipes from the artists of the Silkroad Ensemble. These recipes offer a taste of their cultural traditions and celebrate the universal language of art and shared meals.
As you gather with loved ones this season, we invite you to try these special bread recipes. Whether you’re baking with family, sharing with friends, or connecting with neighbors, we hope these recipes bring a bit of warmth and connection to your table.
Let’s break bread together and celebrate the art of coming together, one bite at a time.
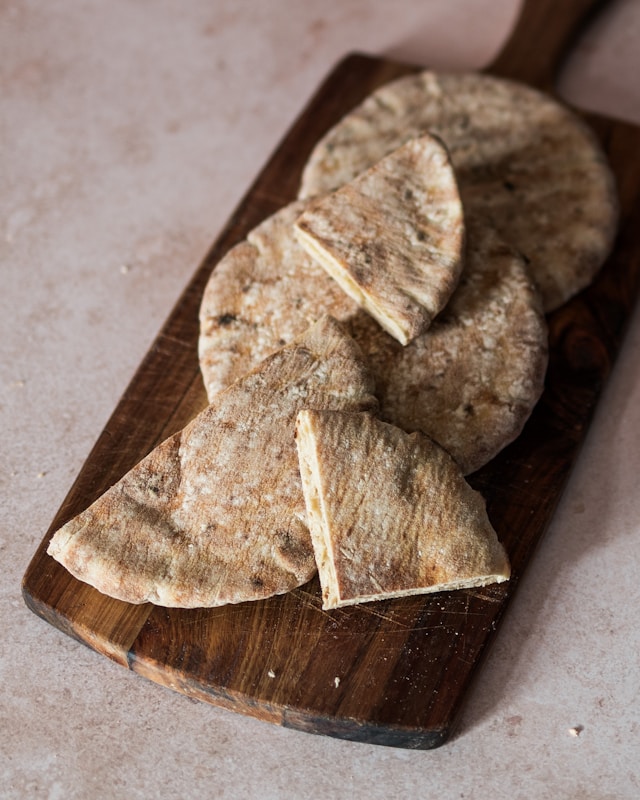
Lebanese Pita Bread
Shared by Layale Chaker
Artist Notes:
Optional Tips
- If you want a softer crust, brush the top with olive oil after baking.
- The Greek yogurt adds a subtle tang and extra moisture, resulting in a tender, soft crumb. But you can go entirely without it, just substitute it with a cup of warm water!
- Enjoy your homemade bread!
Ingredients:
- ¾ cup warm water (110°F or 43°C)
- 1 package active dry yeast (2¼ teaspoons)
- 1 teaspoon sugar (for activating yeast)
- 3¾ cups bread flour (469 grams), plus extra for dusting
- 1½ teaspoons sea salt
- 1 tablespoon sugar
- 3 tablespoons extra-virgin olive oil, plus more for greasing the bowl
- ¾ cup whole-milk Greek yogurt (optional)
Instructions:
Activate the Yeast: In a small bowl, mix the warm water, yeast, and 1 teaspoon of sugar. Let it sit for 5-10 minutes, or until it becomes foamy. This step confirms that the yeast is active.
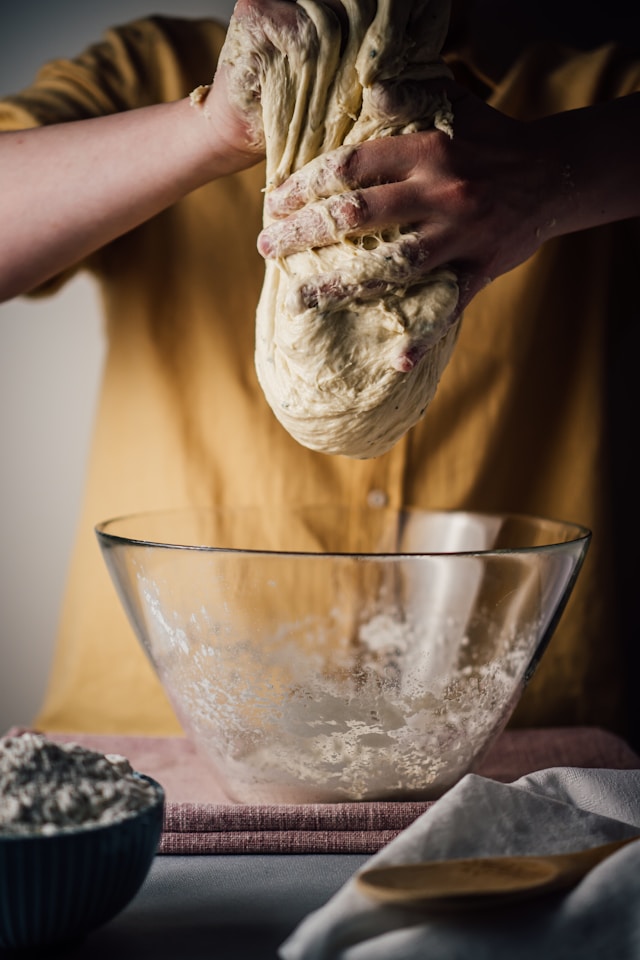
Prepare the Dough: In a large mixing bowl, combine the bread flour, salt, and 1 tablespoon of sugar. Make a well in the center and pour in the activated yeast mixture, olive oil, and Greek yogurt (if using). Stir until the ingredients start to come together and form a sticky dough.
Knead the Dough: Turn the dough out onto a floured surface. Knead it for about 8-10 minutes, or until it becomes smooth and elastic. If the dough is too sticky, sprinkle a little extra flour as needed. The Greek yogurt will make the dough softer and slightly more moist, so adjust with flour if needed.
First Rise: Lightly oil a large, clean bowl and place the dough in it. Cover the bowl with a damp cloth or plastic wrap, and let it rise in a warm, draft-free area for about 1 to 1½ hours, or until it has doubled in size.
Shape the Dough: Once the dough has risen, punch it down to release any air. Transfer it to a floured surface and shape it into a round loaf or divide it for smaller rolls.
Second Rise: Place the shaped dough onto a lightly floured or parchment-lined baking sheet. Cover it loosely with a cloth and let it rise for another 30-45 minutes, or until it’s puffed up.
Bake: Preheat the oven to 375°F (190°C). Bake the loaf for 25-30 minutes, or until the bread is golden brown and sounds hollow when tapped on the bottom. If making rolls, bake for 18-22 minutes.
Cool and Serve: Let the bread cool on a wire rack for at least 10 minutes before slicing.
Hidalgo County Homemade Tortillas
Shared by Edward Perez
Artist Notes:
“Where I grew up, no one would ever eat a tortilla made in a factory. Tortillas were not something that accompanied the rest of the food, they themselves were the main attraction, and my family would sit around the table for long stretches of time on weekend mornings eating more tortillas after we had finished our breakfast plates. Everyone who made tortillas had their own touch and everyone’s tortillas came out just a bit different. My grandmothers were my favorites, and flour tortillas were the first food that I ever learned to prepare. “
Ingredients:
- 4 cups flour
- 1 cup Crisco vegetable shortening (or just a hair less)
- Plenty of salt to taste
- Optional: a tiny pinch of baking powder
- Water as needed
Instructions:
Step 1: Prepare the dough:
- In a large mixing bowl add the flour.
- The Crisco will be sticky, break it into small globs and add it to the bowl, sifting as necessary so that it distributes well.
- Add a generous amount of salt to taste
- Optional (most people prefer the results without): add a small pinch of baking powder
- Pour in a small amount of water to one corner of the bowl and use your hands to clump the flour mix in the immediate vicinity into a little ball of dough. Pull it out and knead it until it has a relatively even consistency.
- Add just a little bit more water into the bowl and put your dough ball back in the spot where it landed, rolling it around and sticking some more of the freshly wet flour mix onto your ball of dough to increase its size. Knead it again until it has an even consistency.
- Repeat the last step as needed until all the flour mix is in one ball of dough. Try to use as little water as possible along the way, always adding more flour to the dough ball if the dough ball seems ready to accept it.
- Once the large ball of dough has a smooth, even consistency, put It back in the bowl, cover with a towel and let it sit for at least ten minutes. Or, as my grandmother told me, “Let him rest.”
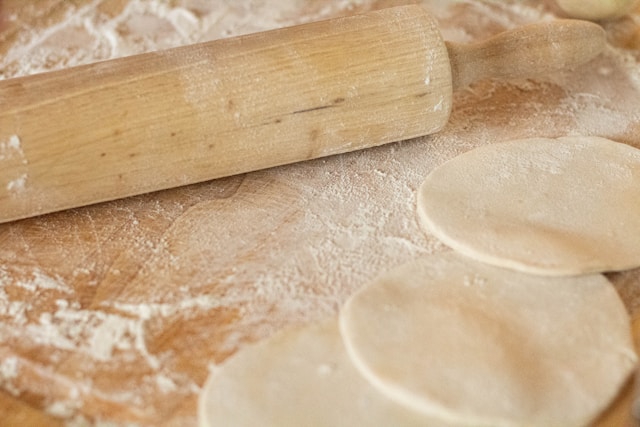
Step 2: Roll the tortillas
- After at least ten minutes, remove the towel and take out a large cutting board (preferably wooden) and a rolling pin
- Pinch off a little bit of dough from the large ball and roll into a small sphere between your palms.
- Place the small dough ball on the cutting board and roll it out with the rolling pin. Roll from the center out, first up then down, then flip the dough over to the other side, rotating 90 degrees in the process, and repeat. If you find that the dough is too sticky, you may choose to add just a little bit of loose flour to the rolling pin, the cutting board, or both. You will find as you begin to roll that the dough naturally wants to contract back to its old position. Once you have rolled it thin/flat enough, it will maintain its shape and that’s how you know you have finished. Rolling perfectly round tortillas takes a lot of practice and depends largely on how consistent you were able to make the ball of dough. Don’t worry if your tortillas come out in funny shapes, they will still taste good.
- Place finished raw tortillas in a stack as you finish each one. Optionally place a tiny bit of flour between each one if they seem to be sticking too much.
- Once you finish rolling the stack of tortillas, they can be kept in this state in the fridge (covered with plastic wrap to prevent drying out) for several days. Do not continue to the step of heating the tortillas until you are going to eat them. In my family, our usual practice was to roll a whole batch and then only heat a small number of them for each meal.
Step 3: Heat the tortillas
- Preheat a comal (heavy cast iron flat griddle) over medium-high burner. Apply a little bit of Crisco to a paper towel and quickly and carefully spread it on the comal to lubricate. If you don’t have a comal, you can try using a non-stick skillet but it’s not quite the same.
- Usually medium-sized tortillas can fit three at a time on the comal. Place three tortillas on the comal. At first, they will stick but after a few seconds, you will be able to slide them around. As soon as they are not sticking, flip them the first time.
- Wait until they are finished on the other side, with a nice white color and a few light –colored burn spots, and then flip them the second time.
- They may inflate after the second flip and this is totally fine (it’s a sign they are cooking on the inside) feel free to press them back down with a spatula or deflate them. Remove them when they are are finished cooking on the other side and repeat, adding three more tortillas until you have heated all of the tortillas that you plan to immediately eat.
- Place finished tortillas on a plate under a towel to keep them warm.
- Put the stack of any remaining unheated raw tortillas in the fridge on a plate covered in plastic wrap
- Never clean the comal with water or soap.
Serving suggestions
Feel free to put a little butter and salt on them. They taste great alone, with coffee, or with scrambled egg in them as breakfast tacos. Even better with egg that has Mexican chorizo scrambled into it.
Tortillas taste far better if eaten in the first thirty seconds to one minute after they come off the comal. Sometimes my family would heat up tortillas for breakfast in two rounds so that we were never eating tortillas that had been sitting around for too long.

Rhiannon Giddens’ Biscuit Recipe (Abridged)
adapted from Southern Living
Shared by Rhiannon Giddens
Ingredients:
- 1 stick unsalted butter – frozen overnight
- 2 1/2 C self-rising flour
- 1 C chilled buttermilk
- parchment paper
- melted butter (2 T)
- pan just big enough for the biscuits you are making
Instructions:
- Measure a piece of parchment paper to fit your pan; make sure to make it longer but exactly as wide, so you can use the overhang to lift the sheet when there’s biscuits on top. Set aside.
- Sift the flour into a bowl and then grate in the frozen butter. Toss together briefly (but no need to work the butter into the dough). Throw this into the freezer.
- While the bowl is in the freezer, preheat the oven to 475 degrees F.
- Make a well in the middle of the butter/flour mixture and pour in the buttermilk.
- Stir until it starts to come together, it should be pretty sticky and a bit wet.
- Turn it out onto a well-floured surface and pat into a rectangle.
- Fold the dough like a letter and flatten out; turn and do it again in the other direction; do that whole process at least once more, for a total of 4 sets of folds.
- Roll or pat out and start cutting your biscuits; use a biscuit cutter or a glass with a sharp edge top to cut them out, being careful NOT to twist (that is a myth that will end up actually curtailing your biscuit’s rise).
- Place the biscuits on the parchment paper, in a honeycomb pattern so that there are no spaces. Move the biscuit laden parchment with the overhang onto the pan; this will take practice.
- Bake at 475 for 12-15 minutes until lightly browned. You can feel they are done by shaking one with your fingertip on top; if they are too movable, they aren’t quite set. Throw them into a basket lined with a tea towel and cover; they will stay nice and moist this way.
Learn more about biscuits from Rhiannon and the best chefs in Durham at Biscuits and Banjos – April 25-27, 2025 in Durham, NC. www.biscuitsandbanjos.com

Sandesh
Shared by Sandeep Das
Artist Notes:
This sweet dish is offered to Gods and Goddesses for every ritual and is a favorite for all festivals like Diwali , Holi, etc. A specialty from Bengal! Love, Sandeep
Ingredients:
- One can of whole milk ricotta cheese
- One small can of sweetened condensed milk
- Optional: cardamom powder and saffron strands
Instructions
- Put the whole can of cheese in a flat pan on a slow to medium high cooktop.
- Keep stirring so it doesn’t stick at the bottom for around 20 minutes then add condensed milk.
- Keep stirring for around 45 minutes, it will start to bubble and thicken.
- Add cardamom powder and saffron strands (optional).
- Once it becomes semi solid, take it off of the stove.
- After it’s cooled, make small balls of it in the shape of Sandesh.
- Serve and enjoy!

Cream Scones
Shared by Maeve Gilchrist
Artist Notes:
- Preheating the baking tray is essential for high-rising scones
- Makes 6 scones
Ingredients:
- 1½ cups (200 g) all-purpose flour
- 1 tablespoon baking powder
- i teaspoons salt
- ¼ cup (50 g) superfine sugar
- 1 cup (240 ml) heavy cream
Instructions:
- Preheat the oven to 425°F (220°C). Lightly flour a baking tray and place in the oven to preheat.
- Sift the flour, baking powder, and salt together in a medium bowl.
- Add the sugar and ¾ cup of the cream; work the dough with a fork until you have even-size clumps. If the mix is too dry to hold together, add the remaining ¼ cup cream and mix thoroughly.
- Place the dough on a floured worktop and knead 4 or 5 times. Dust with flour and roll flat with a rolling pin until i½ to 2 inches thick. Cut out 2½- to 3-inch circles with a crimped scone cutter.
- Place scones on the preheated tray, and bake for 6 to 8 minutes, until they have risen nicely and browned at the edges.
- Serve with jam and butter. Best right out of the oven!
Focaccia Bianca e Rossa
Shared by Francesco Turrisi
Artist Notes:
Nowadays, “focaccia” is everywhere, on every exclusive restaurant’s menu, offered as a thick, fancy, and spongy high-hydration bread, usually topped with all sorts of things. But this doesn’t look at all like the focaccia I grew up eating in Italy. That one was thin, low hydration, crunchy, and drenched in olive oil. It came in grease-proof paper, and it was never eaten as bread at the dinner table. It was the perfect afternoon merenda—the middle-of-the-day snack needed to keep going until 8pm dinner. But it could also be a morning snack (or even breakfast in Liguria!), especially when I was out with my mother shopping, and we would stop at the panetteria (bakery), where we would buy bread and I could get a sneaky little piece of fresh focaccia on the go, and those were the best times! The bakers would always ask, “Bianca o rossa?” (White or red?) They often called it pizza blanca and pizza rossa, just to further confuse the ideas about what is pizza and what is focaccia. Pizza bianca was the classic oily focaccia; pizza rossa was the same but with a veil of tomato sauce on top. So here’s a little recipe to try to recreate those two focacce of my childhood!
This recipe is for two round pans with a 30cm (12in) diameter.
Ingredients:
Focaccia
- 500g (4 cups) 00 bread flour
- 275ml (9.2 oz) cold water
- 7.5g (0.2 oz) fresh brewer’s yeast (or 2.5g (0.8 oz) dried yeast)
- 12.5g (1 tbsp) fine sea salt
- 10g (2/3 tbsp) malt
- Polpa di pomodoro (pomodoro sauce) (optional)
Salamoia (brine)
For each focaccia pan you will need:
- 45ml (3tbsp) water
- ½ tsp sea salt
- Extra-virgin olive oil
Instructions:
- Dissolve the yeast and malt together into the water.
- Add the salt to the flour.
- Add the liquids to the flour and start kneading (by hand or in a stand mixer with bread hook)
- Work the dough for a few minutes until it comes together. Don’t over-knead it—the texture should still be quite rough
- Shape the dough into a ball and put it in an oiled container with a lid. Let it rest in the fridge for at least 20 hours.
- Brush baking pans generously with olive oil
- Divide the dough into two balls of equal weight and start flattening each ball with your hands.
- Use a rolling pin to flatten the dough thinner, into even discs roughly the same diameter of your pans.
- Transfer the dough discs into the pans and let rest uncovered for 90 minutes.
- Dust the discs very lightly with flour and press into them with your index, middle, and ring fingers to create the classic focaccia “holes”.
- Prepare the salamoia by dissolving the salt into lukewarm water.
- Pour the salamoia over the dough (it should almost be submerged) and distribute it equally.
- Pour olive oil over the focaccia holes until they are filled.
- At this stage, if you want to make focaccia rossa, spread a thin layer of polpa di pomodoro over one or both doughs.
- Let rest for another 90 minutes uncovered.
- Preheat oven to 230 C (450 F) degrees.
- Cook the focaccie on the bottom of the oven (touching the bottom) for 6-7 minutes, then finish them for another 2-3 minutes in the middle of the oven.
- Remove the focaccie from the pans and let cool on a rack.
- Brush with olive oil and serve.